Posts

HIPS troubles...

Image
HIPS Having a hard time to get HIPS to stay put on my bed. The usual painter-tape plus glue stick doesn't work. Glue on bare glass didn't work either. Although I was told I had to apply the glue on the cold glass ... and others says that if am to use tape I should use Blue tape. I will try the blue-tape solution first... but seems to me we are headed to having to buy a expensive build surface

CR-10S - Enclosure

Image
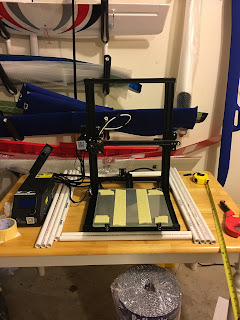
The Enclosure So here we are looking at the limitations of PLA for making RC Model aircraft. The main concern is the low temperature resistance. HIPS seems to be an interesting material with even more stiffness than PLA and much greater heat resistance. Unfortunately, like ABS, HIPS requires a very hot bed and an enclosure. The first thing I did was to make a frame big enough to hold the printer. I didn't include the control box in the enclosure because the control box needs to be kept as cool as possible. Once the frame was completed I covered the top, left, right and back sides with Reflectix an insulation material I got from Lowe's. I used 3M metallic tape (3M 3340) to secure the material to the PVC pipes. This tape is rated to withstand temperatures -40°F (-40°C) to 300°F (149°C)  We left the bottom uncovered and only covered the front partially. The opening was covered using transparent plastic (Optix). We used the same tape to make a hinge one

Eclipson Model-Y - 04

Image
Eclipson Model-Y - 04 Printing Attempt 04 Feedback from Facebook indicated I should disable the "combing mode" because it disabled retraction. Profile:  Fine Layer Height:  0.2 Wall Thickness:  0.4 Top/Bottom Thickness:  0 Infill Density:  0 Enable Retraction:  Checked Retraction Distance:  6mm Retraction Extra Primer Amount:  0 Combing Mode: Off At 11% no major issues At 87% no issues. Print completed in a bit over 5 hours Minor issue found with the support tab on the trailing edge. The surface is not "tight". Lack of "tightness" more noticeable here. No stringing on the build bed of the wing. Oposite side we had adhesion problems when the wing wall thickness changed. This is intended to allow the outer wing sections to connect. Conclusion is while the wing did complete printing with minor issues. layer adhesion issues were significant on the top side of the print. Will have to change p

Eclipson Model-Y - 01 to 03

Image
Eclipson Model-Y 01 to 03 Downloaded the Wing_C.stl Print attempt 01 Loaded Cura 3.2.1 using the standard settings for the CR-10 Modified the following settings: Profile: Fine Layer Height: 0.2 Wall Thickness: 0.4 Top/Bottom Thickness: 0 Infill Density: 0 Enable Retraction:  Checked Retraction Distance: 5mm Saved file to SD Leveled bed CR-10 Put painter tape on CR-10 Used Glue-Stick on print area Started the print the normal way. Monitored the first layers closely to ensure there were no issues. Noticed some minor imperfections on the trailing side but didn't think they were important. Significant issues started to appear 50mm up. the stringing on was very significant on a a nozzle travel path.  This problem was to important to ignore and I stoped the print. Closer examination of the part and the Cura layer view confirmed that the stringing happened on the nozzle travel path. Further examination of the part revealed

CR-10S - First print (after one failed print)

Image
First Print As our first print we attempted to print directly from the cat.gcode file found in the Crealty SD card. Unfortunately that print failed at just under 90%. Apparently the print got unglued from the bed and got knocked over. I'm told this is not the corrupted g-code found in some Crealty SD cards. Since I wasn't sure about this "corrupted g-code" issue. I decided to create my own g-code out of the cat.stl file found in the same SD card.  I loaded the STL file into Cura 3.2, used the standard CR-10 profile in Cura. I specified no-infill and a build plate adhesion. The layer height was automatically set to 0.15. A little over two hours later I finally get a perfect print. Comparing with the original Crealty g-code our print looks more or less the same. The quality is the same. The first print failed because the part did not stayed glued to the bed We are very happy now!